Did I give myself a break after making a pair of pants, which took me half the month?? No, I did not. The very next day I started cutting from this pattern: McCalls 2490. Baby stuff. Because I know someone who is pregnant. =) (It is NOT me)
The sex of the baby is unknown as of yet, so it's gender neutral fabrics for now.
I am starting with the sleepers, on the bottom middle of the picture.
The inevitable screw-up. I didn't have enough fabric to double this piece to cut the sleeves out, so I did two single cuts. But I did them facing the same direction. Ugh. One has to be facing the opposite way. I had just enough fabric left to cut another piece, but it does have a tiny area with permanent market on it. Why do I use permanent marker to trace pattern pieces? (why oh why) Anyhow, I am hoping the market is only on the seam allowance, and will not show on the final project. But the piece that's left over is going to be hard to use for other projects due to the marker. oops.

It's always a learning experience!
Screw-up #1. Elastic sewn on to the wrong placement line. There was a line on the pattern I didn't even see. No big whoop. I took it out, drew the proper line, and put the elastic in the proper spot.

I get so nervous any time I have to clip anything....there's not much room for error!
Screw-up #2. Yes I understand what "right-sides together" means. But my head was with Neil Peart, traveling in the northwest by motorcycle. (The book I'm currently reading is Ghost Rider, by Neil Peart) ADD? Probably. I just can't focus. Oh well. Later on I'll pull all those stitches out (really fun on knits - not) and do it right. It's the process more than the product, right? (sighs)
Hm. Last night I landed on this step. Everything has gone swimmingly so far. This confuses me. I posted about it on Sewing Mamas, and while several people have read my dilemma, not a soul has commented or had an idea. ...great.... lol
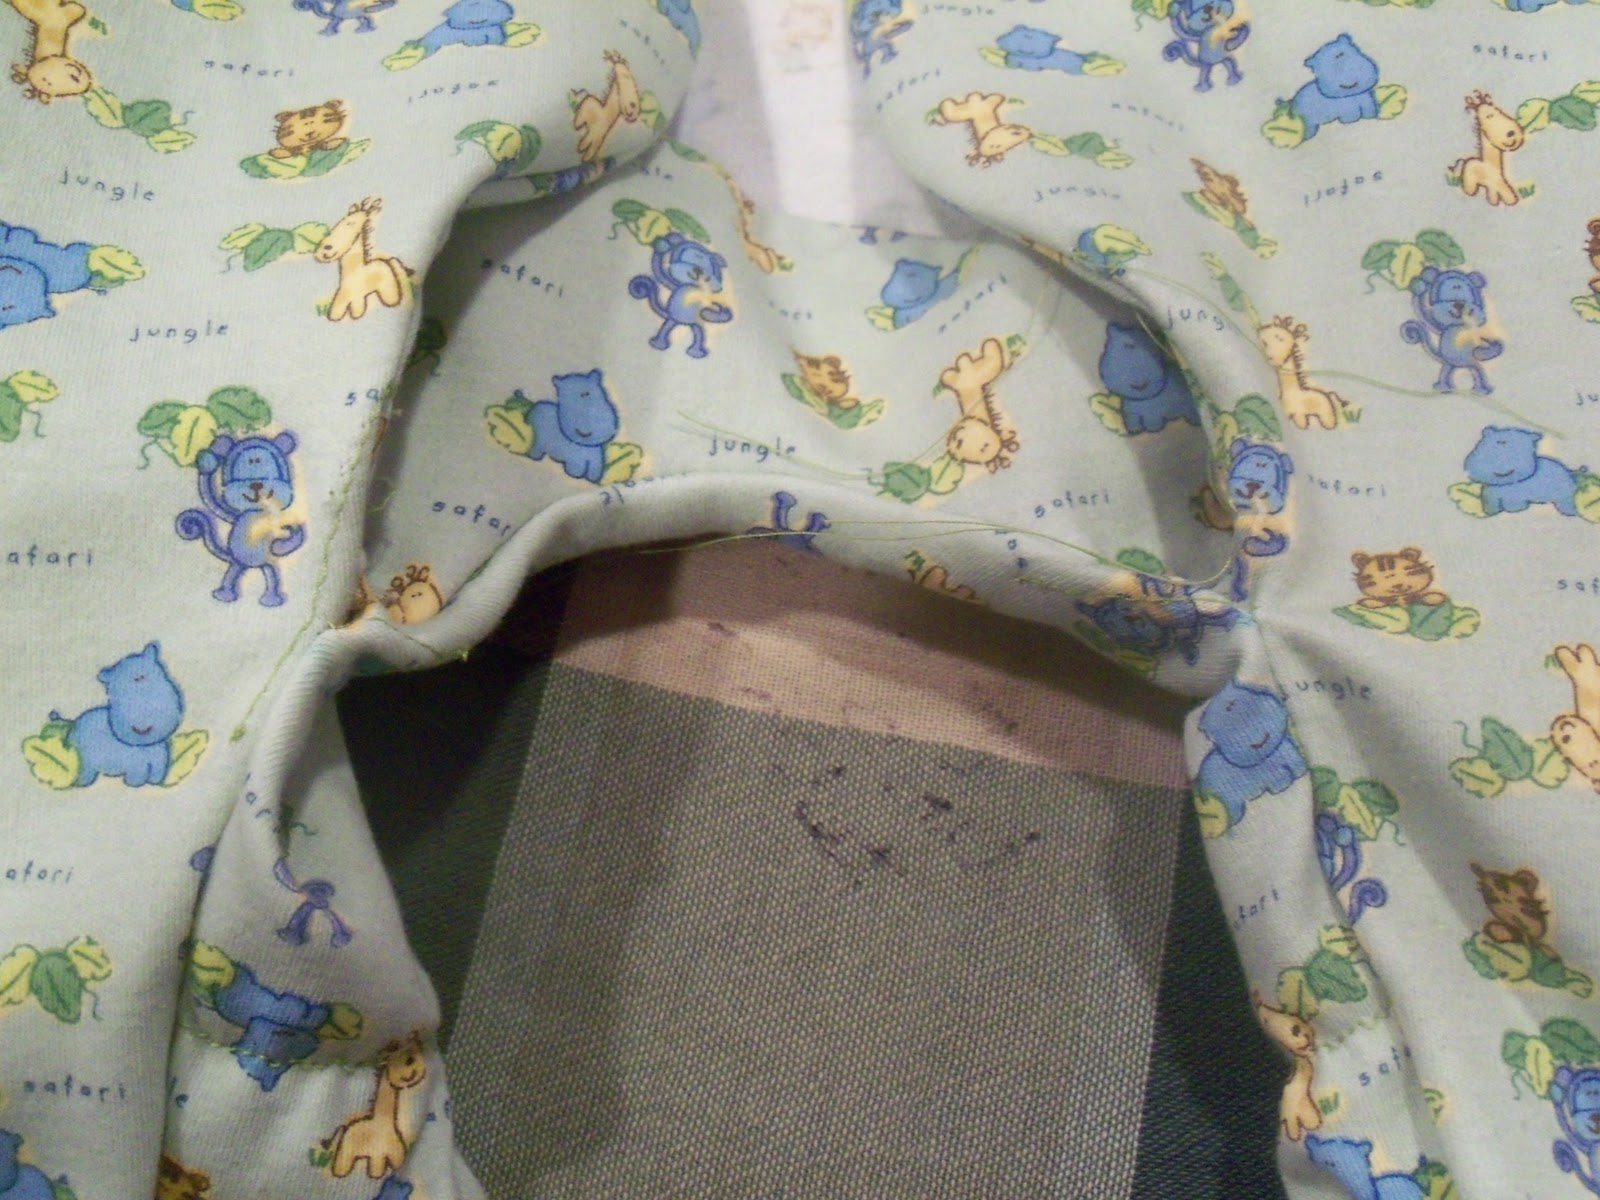
Here's the step. The pieces shown here got sew together after this photo was taken. It creates what looks like a swing. It is then supposed to be sewn onto the front on each side, and between the legs. Easy, right?
I've pinned the piece along one side of the front, and have gotten to the seam on one leg. I am baffled as to how to sew these two pieces together neatly. The top part in the picture is the leg seam. How do I flatten that so that it comes out neat? How do you sew a flat seam onto a non-flat one? Would ironing the leg seam from the inside make a difference? No, that would just add to the complications, I think. Do I just flatten it as neatly as can be done and sew it, understanding that it will be an awkward area? Ugh. I just don't know. And the SMs won't touch it. Darn it!
Just after writing that, a kind SM member suggested that I baste the pieces together first to see how it comes out. If it's wrong, it's easy to take out again. Good idea. I'll do that. She also suggested trying to turn the body piece inside out to see if it looks more doable that way. Another good idea. I'll try those things. Thanks SynEpona!
Jan 21: Last night I reread the directions for this step, and just like that it made sense. You are not supposed to sew between the legs. Just down the sides up to the point of the seams, then stop. Repeat on the other side. Done! Phew. The next step is to sew on the neck band, and I don't have a matching rib knit that is gender neutral. Rats. So this project is on hold until my next trip to JAF.
Jan 24: An evening up ups and downs, as far as sewing goes tonight. I got to JAF and bought the only rib knit they had that would really work with this project, and it wasn't exactly what I wanted. It makes the suit lean toward "boy," when what I really want is gender neutral. A medium blue would have been great. So that was disappointing, but oh well. I got it. So after some confusing with the step that describes how to put the collar on, I put it on.
I got excited when I read that the collar could be sewn or
serged. Was I going to stop my forward progress and take the time to rethread my serger with same-color thread and practice serging on knit scraps? Yep. Why not? I'm on no one's schedule but my own!
The first serging I've ever done on an actual project. Pretty nice. I've much to learn, but I like how it came out. How to secure the threads? For another time.
Dang that's ugly. Sheesh.
The other side of the collar. Just as ugly.

And then......... I was suddenly at the last step. Putting the closure on. But I still had this hole, between the legs and the crotch piece. And that obviously was not supposed to stay that way. The ends on the crotch piece were unfinished, for one thing. For another, there was a hole there that just wasn't supposed to be there. So I was back to square one with that one step that baffled me before. So my "realization" that it wasn't supposed to be sewn there had to be wrong. So I sewed it. And as I figured it would, it came out lumpy, funky, and just not neat. So wrong, in other words. And I'm so discouraged. I just don't know what to do to make it workable. There must be something I missed earlier in the pattern that was key to this step working. Yes, I will take the time to read the entire pattern over again. But how do I fix the sleeper at this point? I'm not sure I can. Shoot.

Jan 25: Ok. So I brought the pattern upstairs prior to my sewing time, and studied it. And then something occurred to me. Perhaps what the directions are trying to request is that the facing be stitched to the front of the garment down to the point of the awkward intersection,
at which point the stitching is secured and cut. Then, directly after the awkward intersection, the stitching is begun again. Stitch between the two awkward intersections, securing the crotch piece to the back of the sleeper. Again, secure the stitching at the second weird intersection, at the leg seam. Jump over to the other side of the leg seam, and begin stitching again, up the opposite side, securing the facing on the other side. Excited to have yet another thing to try, I went onto SewingMamas.com to the thread I started where I asked for help. I wanted to add that I was trying again, with a new plan. I saw at that point that two people had added comments that I had not yet seen. They had been there for several days. The two basically concluded what I had eventually concluded, so my confidence in that plan gained strength. So tonight I picked out the stitches that basically crushed the leg seams, and reinforced the stitching up to each side of the seam. Ah, much better. Now it's definitely not pretty, but I
get it now. If I make another of these suits, I'll be much better prepared to get this part right, and much neater.
So now I face another somewhat tricky part. It's time to put the closure on, which, for this project, is velcro. I'm sure snaps would be better, but whatever. I do what I'm told. (ha) I got the front all lined up, and started marking the spots. I got confused (yes, you are noticing a pattern here) when the pattern said to sew 5 hook pieces plus one on the other side, but only 4 loop pieces on the other side. HUH? Anyhow, I am going to wing it a bit and place five on each side and then study the pattern again.
I had velcro from making cloth diapers ages ago, so instead of buying the width recommended, I used what I had and cut it to size.
Once I actually started sewing the little things on (after I sewed the facing on again, down the front, which makes the placement of the velcro pieces pretty clear) it seemed to go pretty fast. My sewing time ended in the middle of this step, so I'll continue again in two days.... (other plans tomorrow, I only get one break!)
Anyhow, it ain't perfect, but I think it might be usable.
Jan 27: Tonight I finished the suit. I was actually going to start another project, but hope, this one called me. I was so close, I had to just finish it up. So on went the velcro closure. I once again found the directions to be confusing, so I did what I felt was right and worked best. I don't really like the velcro for this, but whatevah.
The goofy crotch area. It came out ok in the end. Not beautiful or perfect, but functional.
I really don't like this. This is the mitt on the sleeves turned inside out. I mean, what if the parent wants to keep the baby's hands free for a while? This is the inside of the mitt, and it would show. I made this observation on Sewing Mamas as well, and one smart person suggested lining the mitt in the future so the pattern would show inside and out. Yup, that's the thing to do. Why didn't the pattern suggest that?
So in the end, the suit is cute, but I'm not sure I'd use this pattern again. I have been told that Kwik Sew infant body suit patterns are simpler.
I am proud of myself for having charged through with this, despite the setbacks and the confusion. There's a lesson (or several) in every project!