I have decided that I no longer need to haul around my large tote bags. The kids are out of diapers, and I just don't need all that stuff. So it's time to switch over to a smaller purse. It's an opportunity to practice tote-making, fabric and color coordinating, design-perfecting, etc.
I also get to use a fabric that I chose for my daughter, and was rejected. =) I love it!
First, I need a basic pattern. I want the purse to hold my fat (not with money - ha!) wallet, and a few other things.
 I drew a rough sketch of how I want the body of the purse to look. My wallet helps me to determine a good width. I did not use a ruler here, but would be happy to give measurements if anyone wants them. I like the idea of the bottom of the bag being a bit wider than the top.
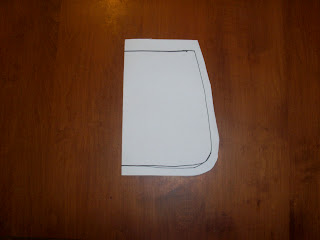 I folded the paper in half so the pattern would be symmetrical. I will place it on the fabric this way, too. Fold the fabric right sides together and place the pattern fold on the fabric fold.
Can't forget to add seam allowances!! Otherwise the bag will end up a bit smaller than expected!
 Shell fabric - two pieces. =)
 Here I'm going to make a pocket for the front of the purse. I took one shell piece and determined how high I wanted the pocket to be. I folded the shell piece to that line in order to make a pocket pattern piece.
 I folded more shell fabric top to bottom, so the fold is on the top. I placed my shell piece, folded to the pocket line, and traced. You'll see what I'm doing in a minute.
 Traced...
 Here is the piece I just traced and cut. I folded it wrong sides together, and placed it over my outer shell piece. (One of them)
 See how that will make a nice pocket? Or maybe two pockets if I decide to stitch in down the middle. I don't know yet. =)
 I now determined how long I want my strap to be. I guess even before that I determined that I want one strap, attached to each side, rather than two straps, attached to each side. To determine this, I held a yard stick against myself, from about where I want the purse to lie against my waist up to my shoulder. I folded my fabric in half, top to bottom, and measured half that length. I determined what I wanted my width to be, and added about an inch for seam allowances.

 This is a miserably poor photo, that does not show the true color of my liner fabric, but it shows what I'm doing. I cut two pieces of lining fabric, using my pattern piece. Again, I determined first that I want an interior pocket. I figured out how high I wanted the pockets to be, I folded down one lining piece to that place, folded more lining fabric top to bottom so the fold is on the top, measured my folded lining piece, and cut a pocket piece. Again, I folded the pocket piece wrong sides together, and placed it against one lining piece.
I decided the bag could use a little structure. My fabric is pretty loose. I cut two pieces of fairly stiff interfacing.
 All the pieces.
 I have decided to turn the front pocket into two pockets. I'm measuring and marking half-way across the bag, and will stitch down the middle.
 It's hard to see it, but I stitched the pocket piece to the front shell piece, along with a piece of the interfacing on the back.
 Why not divide the inner pocket into two also? I think that will work well. Measuring again, and a quick thread switch so it matches the fabric.
 I placed the two shell pieces (the one with the pocket and the one without) right-sides together. I put another piece of interfacing on the back of the other piece. I stitched these pieces together, leaving the top open.
I did the same thing with the lining pieces (no interfacing) but **left an opening of about 5-6"** This will be to turn the bag later on. You'll see.
 I decided to add interfacing to my strap, to give it a little more body, too. I used only one piece here.
I stitched the two strap pieces, right-sides together, with interfacing on one side, down both long ends. I left the short ends open.
 I turned the strap right-side-out, and decided it was way too wide for my little purse. I stitched another line down about 1/2" in from one side, and snipped away the excess. Much better.
 I turned the strap piece right-side-out, and pressed it.
 Here I pinned the strap to each side of the bag, right up against the raw edges at the top.
 I stitched the straps to keep them in place.
 Here I've put the whole shell piece, which is right-side-out inside my lining piece, such that they are right sides together. I made sure the side seams were lined up together (best to pin, but I tend not to sometimes...) and stitched all the way around the top, being sure to catch all layers.
 The bag is ready to be pulled through the gap I left in the lining. For some reason, this photo shows the true color of the lining fabric best. The others make it look pink, which it is not! More of a burgundy.
After pulling it all through, I stitched up the hole in the lining. I tried to get close-ups of that, but they didn't come out.
I pressed around the top of the bag... and....
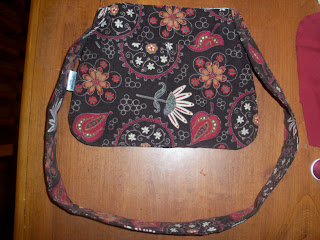
 Voila!
I wanted to do a closure, but kind of forgot. But it would have been easy enough to add a magnetic snap or a flap... maybe next time.
 The front.
 The back.

Inside and inner pockets.

Now the question is, with all my guesstimating and not much actual measuring, will my wallet fit in this purse???
 It did!! =)
I also get to use a fabric that I chose for my daughter, and was rejected. =) I love it!
First, I need a basic pattern. I want the purse to hold my fat (not with money - ha!) wallet, and a few other things.


Can't forget to add seam allowances!! Otherwise the bag will end up a bit smaller than expected!


 This is a miserably poor photo, that does not show the true color of my liner fabric, but it shows what I'm doing. I cut two pieces of lining fabric, using my pattern piece. Again, I determined first that I want an interior pocket. I figured out how high I wanted the pockets to be, I folded down one lining piece to that place, folded more lining fabric top to bottom so the fold is on the top, measured my folded lining piece, and cut a pocket piece. Again, I folded the pocket piece wrong sides together, and placed it against one lining piece.
I decided the bag could use a little structure. My fabric is pretty loose. I cut two pieces of fairly stiff interfacing.


I did the same thing with the lining pieces (no interfacing) but **left an opening of about 5-6"** This will be to turn the bag later on. You'll see.

I stitched the two strap pieces, right-sides together, with interfacing on one side, down both long ends. I left the short ends open.


After pulling it all through, I stitched up the hole in the lining. I tried to get close-ups of that, but they didn't come out.
I pressed around the top of the bag... and....

I wanted to do a closure, but kind of forgot. But it would have been easy enough to add a magnetic snap or a flap... maybe next time.
 The front.
 The back.
Inside and inner pockets.

Now the question is, with all my guesstimating and not much actual measuring, will my wallet fit in this purse???